
NOTE: While Gmail is a popular email client, it is not supported for use with IMAP. As a result, it is not compatible and may not function properly. We recommend using a supported email client for the best experience.
Select your mail client below and follow the instructions.
Outlook (Manual)
Apple Mail (Manual)
iOS for iPhone/iPad/iPod and MacOS® Mail.app® Download (Automatic)
Mail Client Manual Settings
To set up your webmail account on your mobile device, you will need to enter the following manual settings.
.png?width=657&height=296&name=Secure%20SSL_TLS%20Settings%20(Recommended).png)
For incoming mail, use the IMAP protocol with the server name as "mail.yourdomain.com" and port number 993. For outgoing mail, use the SMTP protocol with the server name as "mail.yourdomain.com" and port number 465. Make sure to enable SSL encryption for both incoming and outgoing mail to ensure secure communication (in some cases it should be by default).
If you need further assistance, please refer to our webmail client setup guide below or contact Marketing Services at 713-352-3548.
Outlook app
Step 1: Open your mail client
- Go to the settings menu and select Accounts
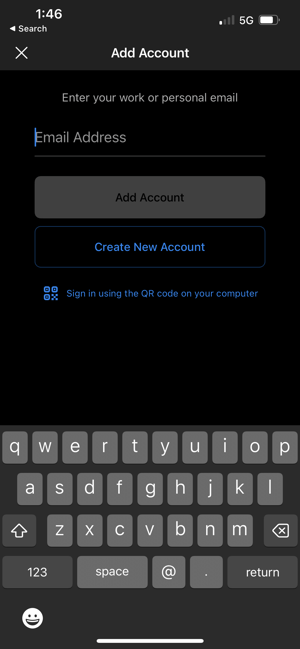
- Select Add Account and enter your business email address and hit the Add Account button
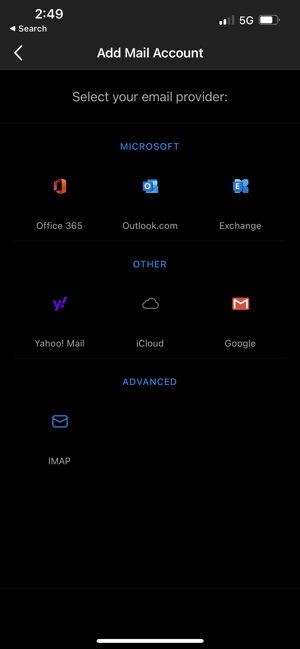
- Select IMAP as your email provider in the Advanced section
- Enter your email address (e.g. johnsmith123@yourdomain.com), display name (e.g. My Mobile Blasting Business), and description (optional)
Step 2: Configure IMAP Incoming Mail Server
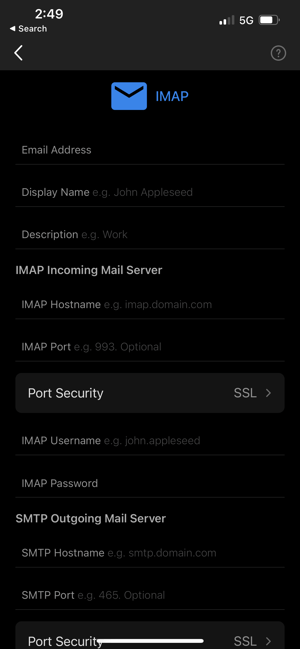
- Enter your IMAP Hostname as mail.yourdomain.com and IMAP Port 993. Make sure the Port Security is set to SSL (should be set by default)
- Enter your IMAP Username as user@yourdomain.com (this will be your business email address)
- Enter your password that you use to login to your webmail account in the IMAP Password field
Step 3: Configure SMTP Outgoing Mail Server

- Enter your SMTP Hostname as mail.yourdomain.com and SMTP Port 465. Make sure the Port Security is set to SSL (should be set by default)
- Enter your SMTP Username as user@yourdomain.com (this will be your business email address)
- Enter your password that you use to login to your webmail account in the SMTP Password field
- After completing this step, save your settings and you are now ready to send and receive emails from your mail client securely
If the redirection to your mailbox doesn't happen automatically, you can easily access it by swiping right from the left screen or tapping your profile icon located next to the Inbox at the top left corner of your screen. This will open your account and display all your email accounts, inboxes, drafts, and deleted messages (if you have multiple accounts). To access a specific email account, simply select the profile icon associated with it, and all your messages will be visible.
Apple Mail app
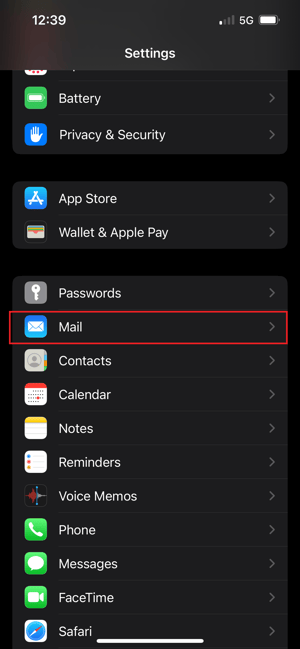
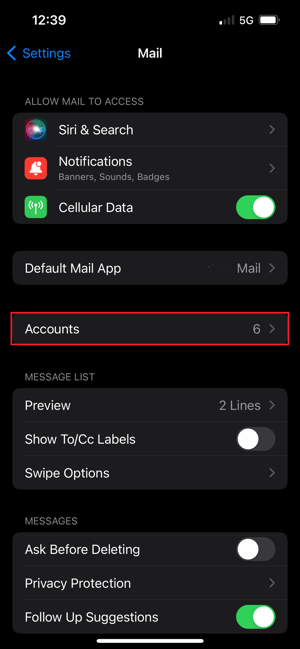
Step 1: Open your iOS Settings
- Scroll down and select Mail
- Select Accounts
Step 2: Adding an account
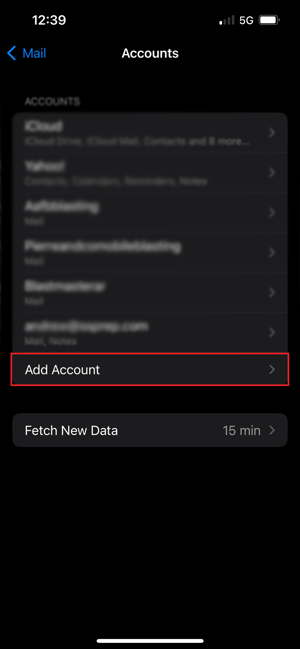
- Select Add Account
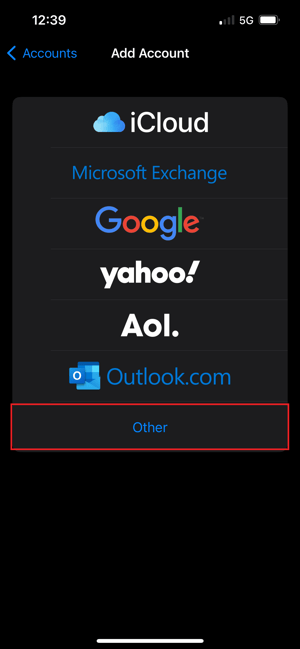
- Select Other as your email service provider choice
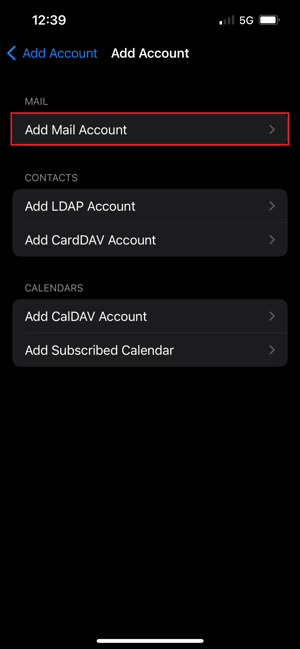
- Select Add Mail Account
Step 4: Enter new account information
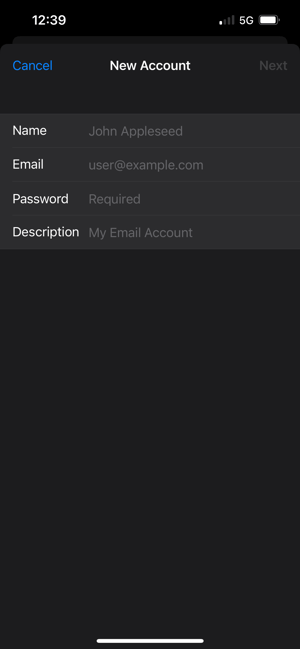
- Enter your business name in the Name text field (this is the name it will appear as in your mailbox so you can identify it)
- Enter your business email address
- Enter your password that you use for webmail login
- Enter a description about this account (It will auto-fill once you enter your email address but you can edit if you prefer e.g. My business email, Company name email, etc.)
- Tap Next once all the information is filled out
Step 5: Enter mail client settings
- Enter your business name in the Name text field
- Enter your business email address in the Email text field
- Choose IMAP as your Incoming/Outgoing Mail Server type
- Enter the hostname of your mail server in the Host Name text field (e.g. mail.domain.com)
- Enter your same password once more
- Repeat these steps for the Outgoing Mail Server with the same information
- Tap Next in the top right corner once you're done to start the verification process
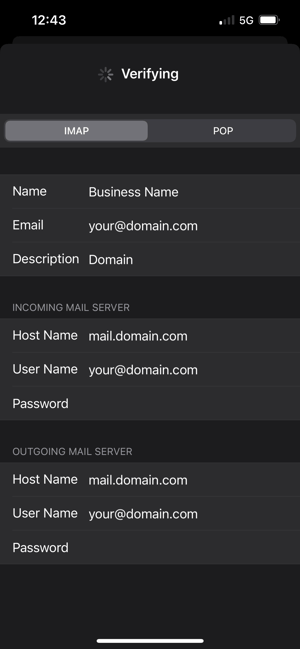
- It will take a moment to verify the account details but once successfully verified, you should see blue check marks on the right side of each text field indicating all the information is valid
- You will automatically be redirected to this screen
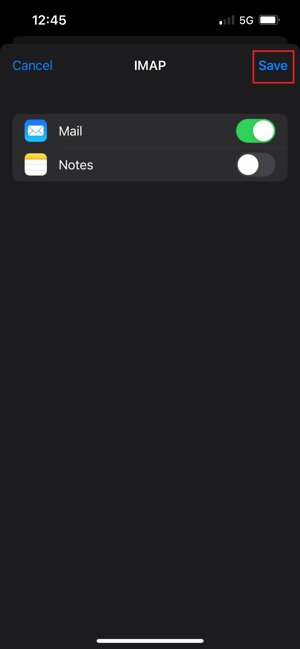
- Tap Save in the top right corner
- You'll then be redirected to your mailboxes and your new account should appear alongside your other accounts (if you have more than one) and you can now select your new account and send and receive messages on the go
iOS for iPhone/iPad/iPod and MacOS® Mail.app® Download
If you have an iOS device (iPhone, Mac, iPad), you can automatically download the configuration file instead, please contact Marketing Services to receive your download file.
- Tap or click the file to download
- Go to your Files app (mobile) and download if it doesn't already download once you tap the file or your Downloads in the Finder (laptop/desktop)
- Follow the prompt to go to your Settings (mobile) or go to your System Preferences and click Profiles to install it, a prompt will appear to enter the password for the email account. Once entered, click Install (laptop/desktop)
- Under your iCloud account/profile a new tab should appear that says "Profile Download" (mobile)
- Select that tab and it should automatically implement your information (mobile)
If successful, the email account should appear as a new mailbox and you can check either the Mail app in the Settings or directly in the Mail app.